As I've explored in other posts, custom gif stickers for Instagram Stories are a great way to keep your brand identity consistent. Here's the easy way to make gif stickers in Photoshop!

Gifs are one of the coolest things about Instagram Stories, mostly because of the huge variety of artwork available through the provider Giphy. But as cool as a lot of that artwork is, having a small business or personal brand account on Instagram means making your account as visually consistent as possible. Making and using your own gifs with your brand's fonts, icons, and colors is easier than you might think!
Start with the image you want to turn into a moving picture. Keep in mind that "moving" isn't limited to just position of the image--it can also mean rotating, color changing, or adding and subtracting elements. If you need some inspiration, try browsing Instagram for the types of gifs you've used in the past, or think about the type of content you'll be posting. For my own account, I like to use gifs and stickers that say "new post," "link in bio," or "new on the blog" using my brand fonts. I also have a bunch of my blog's icons, like the shooting star icon, that move back and forth.
Also remember that if you are going to be pasting these over Instagram Stories, you'll want the background of your images to be transparent. This means saving your artwork as a transparent PNG file when exporting from Illustrator or your program of choice.
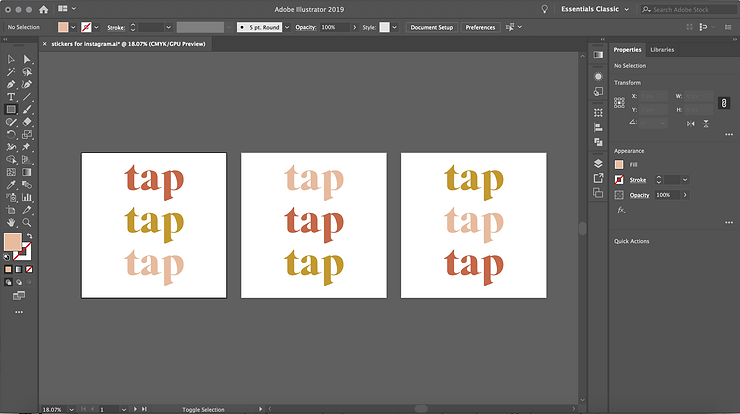
To start, picture how you want your artwork to move, and how many times you want it to change position or color before returning to the starting image. I am using this artwork that says "tap tap tap," and I want the colors to rotate down one each time the gif moves. So I am using three 1000x1000px artboards in Illustrator because I will end up with a gif that moves three times on an endless, closed loop. You might want more or even fewer panels depending on your artwork. Generally the fewer panels, the better, because you don't want your file size to be too large or your gif to be too long or complex.

Once you have your artwork ready, export it from Illustrator, remembering to select PNG with the transparency box checked.
Then open Photoshop with a board is the same size as your original artwork. (Again, mine is 1000x1000px.) Make sure you unlock and delete the default background layer, as it is white and the background of a sticker needs to be transparent. Add each art piece to a new layer by selecting File > Place Embedded or clicking and dragging it into the window. The whole time this process is happening, the background should remain the gray transparency grid with your artwork on top.

After you have made new layers for each artwork, you will open the animation panel: Window > Timeline. That will open a control panel at the bottom of the page, where you will build the frames of your gif.
To do so, click the hamburger menu at the top right of the Timeline panel and select Make Frames From Layers. This means that there will be a frame where each of your layers is visible for a set amount of time.

You should now see the same amount of frames for the number of layers/artwork you have. For me, there are still three. Change the loop setting to Forever and set your time to whatever you'd like. I prefer .5 seconds because it is just long enough that the effects are still visible, but not too long that the viewer does not realize it actually moves. Play around with the time settings and hit Play/Stop to preview them. When you find a setting you like, it's time to export!

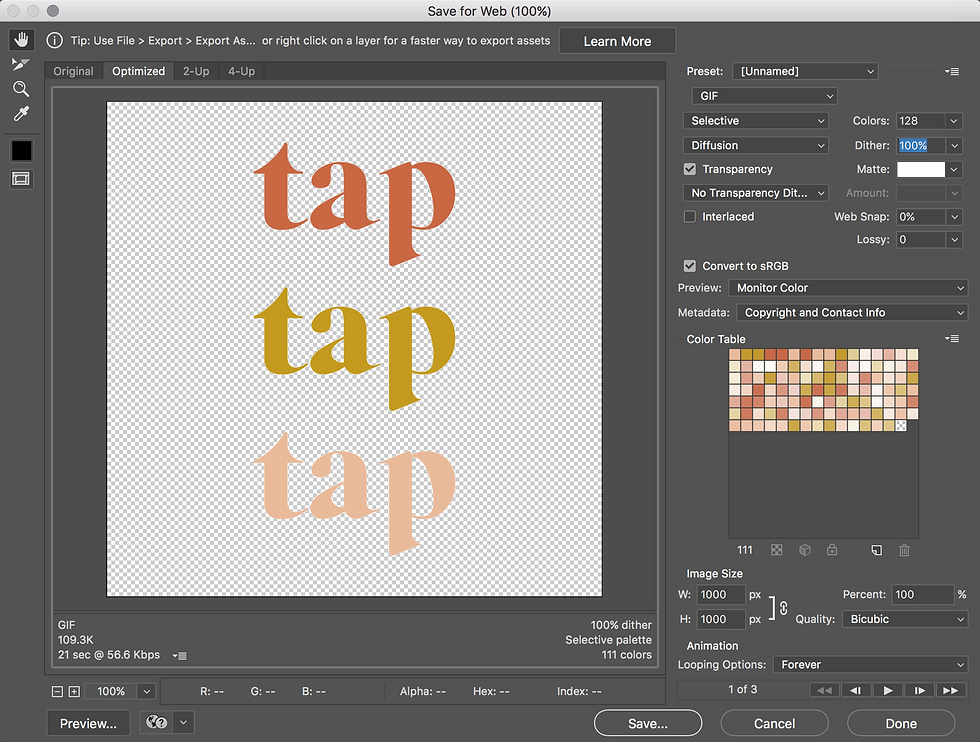
Gifs for Instagram Stories need to be moving gif files, not video or still image. To accomplish that, click File > Export > Save for Web (Legacy). Below are the settings that I use for Dither and colors, but play around with your image to see what looks good. What is most important is that GIF is selected from the dropdown menu. You can preview the file by pressing the play button in the bottom right corner. Once you are happy with the settings, hit Save and export your file.


And you should end up with something like this! To place them in an Instagram Story, you can either upload them to your personal account on Giphy and copy them that way, or just copy them from your Photos app on your phone directly. Create your Story however you'd like, and then paste your gif using the text tool or by clicking the Add Sticker button that pops up in the bottom left corner of your screen. Either way works and should place your beautiful animated gif into your story!
I love using my gifs for pasting over shared posts from my grid, or to accompany new blog posts or behind the scenes screen recordings I share. There are so many cool ways to use stickers like this!
Tip: You can also use your original PNG artwork as copy and paste stickers in your stories! Just save them to your phone and use the same methods as above. Multi-purpose art!
I hope you enjoyed this tutorial and learned something fun and new. Be sure to leave a comment down below and tag me in your creations @mugglehugstudio on Instagram!
Happy creating, and thanks for reading!


Comments